
Are you ready to discover the most powerful boons in Hades 2? Melinoë faces an immense challenge, not only confronting Chronos, the formidable god of time, but also leading an assault on Mount Olympus. It’s certainly a busy day for our heroine! To triumph in Hades 2, mastering the perfect build to match your unique playstyle is crucial. Boons are divine gifts that enhance your abilities, offering both powerful upgrades to your existing skills and entirely new ways to obliterate Melinoë’s adversaries.
Every Boon in Hades 2
Beyond increasing their effectiveness through ranks, each boon possesses a distinct elemental affinity. Once you unlock the Divination of the Elements at the cauldron, you’ll observe an element displayed in the top-left corner of each skill as you select it.
Generally, these affinities align with the deity providing the boon – for instance, Zeus often grants Air-elemental boons, while Poseidon bestows Water-elemental ones. However, there are exceptions, with some gods offering skills tied to multiple elements. Certain boons also require you to have an affinity for specific elements, which you acquire by accumulating them from your previously chosen skills. There are other methods to gain elements; for example, one of Narcissus’s perks grants you one of each type.
Here’s a comprehensive list of all Hades 2 boons, highlighting our top recommendations for each god:
- Aphrodite
- Ares
- Apollo
- Arachne
- Artemis
- Chaos
- Circe
- Demeter
- Echo
- Hades
- Hephaestus
- Hera
- Hermes
- Hestia
- Icarus
- Medea
- Narcissus
- Poseidon
- Selene
- Zeus
Aphrodite
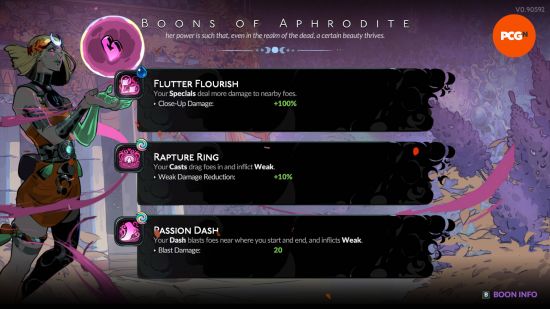
Aphrodite’s core strategy revolves around stacking Weak effects, which significantly diminishes an afflicted enemy’s damage output by 30%. This makes close-quarters combat much safer. For optimal results, consider Broken Resolve, Rapture Ring, Glamor Gain, and Secret Crush among Aphrodite’s perks.
| Boon | Effect | Element |
| Broken Resolve | Your Weak effects are more potent. | Water |
| Burning Desire | Hestia Duo: Up to 120 Lone Shades appear in locations. Sprint into them to launch a fiery blast. | Aether |
| Ecstatic Obsession | During encounters with multiple foes, one foe is always afflicted with Charm. | Aether |
| Flutter Flourish | Your specials deal more damage to nearby foes. | Water |
| Flutter Strike | Your attacks deal more damage to nearby foes. | Water |
| Glamor Gain | In each encounter, one foe is always Weak. You gradually restore Magick near Weak foes. | Air |
| Healthy Rebound | Whenever you exit a location, restore 100% of your life if you’ve not lost more than a percentage. | Water |
| Heart Breaker | Whenever you use 30 Magick, create a Hearthrob. This is an explosive that revolves around you and expires after 20 seconds. | Water |
| Island Getaway | Poseidon Duo: You take less damage from nearby foes. Boons of Aphrodite treat all foes as nearby. | Aether |
| Life Affirmation | Any max life rewards you find will have a greater effect. | Air |
| Nervous Wreck | When you inflict Weak, also inflict a curse from another Olympian. | Air |
| Passion Rush | Your Dash blasts foes near where you start and end, and also inflicts Weak. | Air |
| Rapture Ring | Your Casts drag foes in and inflict Weak. | Air |
| Romantic Spark | Zeus Duo: If you sprint into Blitz-afflicted foes, the effect activates immediately and is stronger. | Aether |
| Secret Crush | After you enter a location, Prime 20 Magick to add Power to your attack. | Air |
| Shameless Attitude | While you have at least 80% health, you deal more damage. | Air |
| Soft Caress | Hephaestus Duo: The first time you would take damage in each Encounter, get HP instead. | Aether |
| Soul Mate | Hero Duo: Foes with Hitch take more damage and are Weak, but only two can be afflicted at a time. | Aether |
| Spiritual Affirmation | Any max health increases you find have a greater effect. | Air |
| Sunny Disposition | Aphrodite Duo: Whenever you create Heartthrobs, create more. | Aether |
| Wispy Wiles | Infusion: Gain +3% dodge chance for each Air element you have. | N/A |
Ares

Ares, the god of war, is singularly focused on inflicting pain upon anyone who dares oppose you. His signature status effect, Wound, causes affected enemies to suffer increased damage for a brief period. For maximum carnage, prioritize Ares Boons such as Grievous Blow, Mutual Destruction, Profuse Bleeding, and Vicious Strike.
| Boon | Effect | Element |
| Arterial Spray | Poseidon Duo: Your Splash effects from Poseidon may hit twice. | Aether |
| Blood Spree | While you have less than 40 health, your attacks and specials restore health. | Earth |
| Coffin Nail | Your falling blades fall immediately and deal more damage | Aether |
| Cut Above | Your Omega moves also cause a falling blade to appear over each foe struck. | Earth |
| Cutting Edge | Your falling blades drop an additional time and deal more damage in a large area. | Earth |
| Fourth Degree | Hestia Duo: Your fireball effects inflict Wounds with even greater power. | Aether |
| Grievous Blow | Foes with Wounds may suffer additional damage when attacked. | Earth |
| Grisly Gain | Striking Foes with your weapon may spill Plasma, which also restores ten Magick. | Earth |
| Heinous Affront | Inflicting Wounds may also trigger your ‘after you take damage’ effects. | Aether |
| Hostile Environment | Your Omega cast is stronger and follows you, even as you channel. | Aether |
| Meat Grinder | Your Omega cast also creates a Blade Rift in the binding circle. | Earth |
| Mutual Destruction | Gain a chance to deal 200% damage that increases the less health you have. | Earth |
| Open Heart | Aphrodite Duo: Whenever you collect a Blood Drop, create a Heartthrob. | Aether |
| Profuse Bleeding | Whenever foes with Wounds take damage, they may spill a Blood Drop. | Earth |
| Rallying Cry | Infusion: While you have eight Earth Boons, any of your damaging effects are stronger. | N/A |
| Sanguinary Savor | Each Blood drop has improved potency and is drawn to you. | Earth |
| Single Elimination | You deal more damage to foes that are isolated. | Earth |
| Stabbing Rush | Your dash creates a row of falling blades along your path. | Earth |
| Sword Ring | Your casts create a falling blade over each foe in the binding circle. | Earth |
| Universal Donor | Whenever you exit a location, keep some of your Blood Drops. | Aether |
| Vicious Flourish | Your specials deal more damage and inflict Wounds. | Earth |
| Vicious Strike | Your attacks deal more damage and inflict Wounds. | Earth |
| Visceral Impact | After you take damage or a foe is slain, spill Blood Drops. | Earth |
Apollo
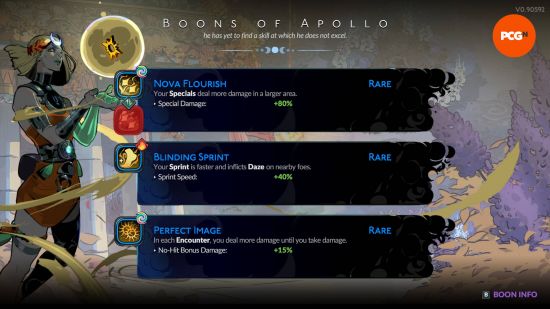
Apollo’s boons empower you to inflict the Daze ailment upon your enemies. This status effect has a chance to make foes deal no damage when they hit you. While not always consistent, it can be a lifesaver during challenging boss encounters. The most advantageous Apollo boons include Back Burner, Blinding Sprint, Critical Miss, Dazzling Display, Extra Dose, and Nova Strike.
| Boon | Effect | Element |
| Back Burner | Foes with Daze take more damage if struck from behind. | Fire |
| Beach Ball | Poseidon Duo: Your sprint creates a watery sphere behind you. After it stops, it surges ahead and bursts. | Aether |
| Blinding Sprint | Your sprint is fast and inflicts Daze on nearby foes. | Fire |
| Critical Miss | Foes take damage whenever Daze causes them to miss. | Air |
| Dazzling Display | Your attacks may inflict Daze. | Fire |
| Exceptional Talent | Your Omega Attack and Omega Special fires twice, but use up more Magick. | Air |
| Extra Dose | Your attack has the chance to hit multiple times. | Fire |
| Glorious Disaster | Zeus Duo: You can channel +30 Magick into your Cast to repeatedly strike foes with lightning bolts. | Aether |
| Light Smite | After you take damage, your foe takes damage, and you inflict Daze on all foes. | Fire |
| Lucid Gain | While standing in your Casts, gradually restore Magick. | Air |
| Nova Flourish | Your Specials deal more damage in a larger area. | Air |
| Nova Strike | Your attacks deal more damage in a larger area. | Air |
| Perfect Image | In each encounter, you deal more damage until you take damage. | Air |
| Phoenix Skin | Hestia Duo: Give up 100 HP. If you do not take or deal damage for three seconds, rapidly restore HP. | Aether |
| Prominence Flare | After your Omega cast expires, rapidly deal damage in the area. | Fire |
| Self Healing | Infusion: While you have at least three fire boons, whenever you take damage, restore some life. | N/A |
| Solar Ring | After your Omega Cast expires, rapidly deal damage in the area for two seconds. | Fire |
| Stellar Slam | Hephaestus Duo: Your blast effects from Hephaestus deal damage in a larger area. | Aether |
| Sun Worshiper | Hero Duo: In each encounter, the first foe you kill returns to fight alongside you. | Aether |
| Sunny Disposition | Aphrodite Duo: Whenever you create Heartthrobs, create more. | Aether |
| Super Nova | Your Casts expand in size until they expire. | Air |
| Torrential Downpour | Demeter Duo: Each time you use your Omega Cast in an encounter, it gets stronger, but also uses +5 Magick. | Aether |
Arachne
Arachne is an NPC you’ll encounter in Erebus. She offers a choice of three distinct dresses, each providing a significant armor buff and a unique perk. Should your armor deplete, any armor purchased from Charon’s shop will replenish it, and certain Arcana Cards can further enhance its durability.
For magick users, the Azure Dress or Lavender Dress are excellent choices. If guaranteed health recovery is your priority, opt for the Emerald Dress. Finally, if you’re looking for increased area-of-effect damage, the Scarlet Dress is your go-to.
| Boon | Effect | Rarity upgrades |
| Azure Dress | Don a +40 armor outfit that makes you restore five Magick every second. | N/A |
| Emerald Dress | Don a +50 armor outfit that makes you restore two life whenever you exit a location. | N/A |
| Lavender Dress | Don a +30 armor outfit that makes you channel 40% faster. | N/A |
| Moonlight Dress | Don a +20 armor outfit that grants plus five gold whenever you exit a location. | N/A |
| Onyx Dress | Don a +60 armor outfit that creates +1 Fate Fabric now. | N/A |
| Scarlet Dress | Don a +10 armor outfit that makes your Casts deal +100% damage | N/A |
Artemis
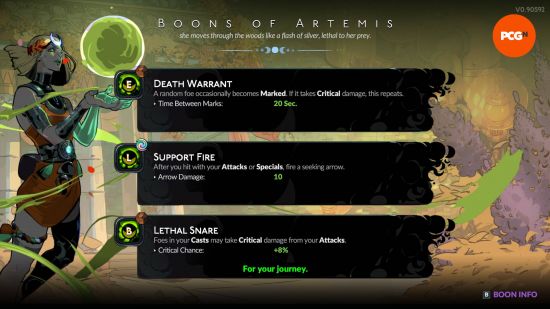
Artemis occasionally intervenes from off-screen during your runs, assisting with large waves of enemies. After their defeat, she’ll appear, allowing you to converse with her and receive one of her powerful boons. Her offerings primarily boost your critical hit chance or grant additional attacks. Our top recommendations are Easy Shot, First Blood, Lethal Snare, or Support Fire.
| Boon | Effect | Element |
| Death Warrant | A random foe occasionally becomes Marked. If it takes Critical damage, this repeats. | Earth |
| Easy Shot | A piercing arrow fires toward any foe damaged by your Casts. | Air |
| First Blood | Foes with at least 80% health or 80% armor may take critical damage. | Earth |
| Lethal Snare | Foes in your Casts may take critical damage from your attacks. | Earth |
| Pressure Points | Any damage you deal may be Critical. | Earth |
| Silver Streak | After you dash, your Omega moves deals more damage for two seconds. | Air |
| Support Fire | After you hit with your attacks or Specials, fire a seeking bow. | Air |
Chaos

Chaos boons are among the more unique you’ll encounter. Typically, you’ll sacrifice some health to enter their realm, enduring a temporary curse for several encounters before finally reaping a powerful, lasting buff. With numerous options available, the curses that are easiest to manage while offering substantial rewards are Addled Blood, Fixated Affluence, Ordinary Defiance, and Rejected Will.
| Boon | Effect | |
| Addled Blood | For the next three encounters, each time you use Casts, you get hit for -6 life. Afterward, whenever you exit a location, restore ten life. | |
| Addled Flourish | For the next three encounters, each time you use Casts, you get hit for -6 life. Afterward, your Specials deal +71% additional damage. | |
| Addled Mind | For the next three encounters, each time you use Casts, you get hit for -6 life. Afterward, gain max Magick. | |
| Atrophic Affluence | For the next four encounters, you have -22 Max life. Afterward, any Gold Crown you find is worth +50%. | |
| Atrophic Discovery | For the next four encounters, you have -22 Max life. Afterward, you have a 62% chance to find +100% resources with your Gathering Tools. | |
| Atrophic Flourish | For the next four encounters, you have -22 Max life. Afterward, your Specials deal +80% additional damage. | |
| Atrophic Revelation | For the next four encounters, you have -22 Max life. Afterward, you channel your Omega moves 10% faster. | |
| Atrophic Soul | For the next four encounters, you have -22 Max life. Afterward, gain +35 Max life. | |
| Caustic Celerity | For the next X encounters, slain foes toss an Inferno-Bomb at you. Afterward, you move and Sprint faster | |
| Caustic Creation | For the next three encounters, slain foes toss an Inferno-Bomb at you. Afterward, gain one of each elemental stone. | |
| Caustic Favor | For the next three encounters, slain foes toss an Inferno-Bomb at you. Afterward, Boons have a +47% chance to be Rare or better. | |
| Caustic Talent | For the next three encounters, slain foes toss an Inferno-Bomb at you. Afterward, you use -45% Magick. | |
| Doomed Affluence | You have 120 seconds to clear the next three encounters, or you get hit for -500 life. Afterward, any Gold Crown you find is worth +105%. | |
| Doomed Chasm | You have 120 seconds to clear the next two encounters, or you get hit for -500 life. Afterward, your Casts deal +66% additional damage. | |
| Doomed Favor | You have 120 seconds to clear the next two encounters, or you get hit for -500 life. Afterward, Boons have a 44% chance to be Rare of better. | |
| Doomed Mind | You have 120 seconds to clear the next three encounters, or you get hit for -500 life. Afterward, gain +62 max Magick. | |
| Doomed Revelation | You have 120 seconds to clear two encounters or get hit for -500 life. Afterward, you can channel your Omega Moves 15% faster. | |
| Doomed Will | You have 120 seconds to clear two encounters or get hit for -500 life. Afterward, restore five Magick every one second. | |
| Enshrouded Chant | For the next five locations, location reward previews are hidden. Afterward, your Omega moves deal 36% additional damage for each Aether you have. | |
| Enshrouded Soul | For the next four locations, location reward previews are hidden. Afterward, gain 27 max life. | |
| Enshrouded Will | For the next five locations, location reward previews are hidden. Afterward, restore five Magick every second. | |
| Excruciating Affluence | For the next five encounters, you take +33% damage. Afterward, any Gold Crown you find is worth +40% | |
| Excruciating Blood | For the next five encounters, you take +33% damage. Afterward, whenever you exit a location, restore 11 life. | |
| Excruciating Celerity | For the next four encounters, you take +33% damage. Afterward, you move and sprint faster. | |
| Excruciating Creation | For the next five encounters, you take +33% damage. Afterward, gain Earth, Water, Air, Fire, and Aether. | |
| Excruciating Talent | For the next three encounters, you take +33% damage. Afterward, you use -35% Magick. | |
| Excruciating Will | For the next five encounters, you take +33% damage. Afterward, restore 8.5 Magick every second. | |
| Fixated Affluence | For the next three encounters, whenever you use Magick, Prime it. Afterward, your attacks deal +21% damage. | |
| Fixated Blood | For the next five encounters, whenever you use Magick, Prime it. Afterward, whenever you exit a location, restore life. | |
| Fixated Chasm | For the next three encounters, whenever you use Magick, Prime it. Afterward, your Cast deals +71% damage. | |
| Fixated Discovery | For the next three encounters, whenever you use Magick, Prime it. Afterward, you have a 75% chance to find +100% resources with your Harvesting Tool. | |
| Fixated Mind | For the next four encounters, whenever you use Magick, Prime it. Afterward, gain +33 Max Magick. | |
| Fixated Soul | For the next four encounters, whenever you use Magick, Prime it. Afterward, gain 60 max life. | |
| Flayed Blood | For the next four encounters, each time you use Specials, you get hit for -5 life. Afterward, whenever you exit a location, restore 11 life. | |
| Flayed Favor | For the next four encounters, each time you use Specials, you get hit for -5 life. Afterward, Boons have a chance to be Rare or better. | |
| Flayed Mind | For the next four encounters, each time you use Specials, you get hit for -5 life. Afterward, gain +48 Max Magick. | |
| Flayed Will | For the next four encounters, each time you use Specials, you get hit for -5 life. Afterward, restore 13.5 Magick every second. | |
| Gagged Discovery | For the next three encounters, each time you use Omega Moves, you get hit for -6 Life. Afterward, you have a 66% chance to find +100% resources with your Harvesting Tool. | |
| Gagged Revelation | For the next three encounters, each time you use Omega Moves, you get hit for -6 Life. Afterward, you channel your Omega Moves 18% faster. | |
| Gagged Talent | For the next three encounters, each time you use Omega Moves, you get hit for -6 Life. Afterward, you use -40% Magick. | |
| Hobbled Affluence | For the next five encounters, your Dash is slower and also uses five Magick. Afterward, any Gold Crown you find is worth 50% more. | |
| Hobbled Creation | For the next five encounters, your Dash is slower and also uses five Magick. Afterward, gain +2 Earth, Water, Air, Fire, and Aether. | |
| Hobbled Favor | For the next four encounters, your Dash is slower and also uses five Magick. Afterward, Boons have a +55% chance to be Rare or better. | |
| Hobbled Soul | For the next five encounters, your Dash is slower and also uses five Magick. Afterward, you gain +30 Max Life. | |
| Maimed Chasm | For the next four encounters, each time you use Attacks, you get hit for -5 Life. Afterward, your Casts deal +47% damage. | |
| Maimed Favor | For the next three encounters, each time you use Attacks, you get hit for -5 Life. Afterward, your Casts deal additional damage | |
| Maimed Revelation | For the next four encounters, each time you use Attacks, you get hit for -5 Life. Afterward, you channel your Omega Moves 24% faster. | |
| Maimed Soul | For the next four encounters, each time you use Attacks, you get hit for -5 Life. Afterward, gain +30 Max Life. | |
| Maimed Wall | For the next four encounters, each time you use Attacks, you get hit for -5 Life. Afterward, restore 10.5 Magick every second. | |
| Ordinary Affluence | The next two boons you find are limited to Common blessings. Afterward, any Gold Crown you find is worth +85% more. | |
| Ordinary Defiance | The next three Boons you find are limited to Common blessings. Afterward, you gain +1 use of Death Defiance this night. | |
| Ordinary Discovery | The next three Boons you find are limited to Common blessings. Afterward, you have a set chance to find +100% resources with gathering tools. | |
| Ordinary Revelation | The next two Boons you find are limited to Common blessings. Afterward, you Channel your Omega moves 15% faster. | |
| Ordinary Strike | The next two Boons you find are limited to Common blessings. Afterward, your Attacks deal +29% damage. | |
| Ordinary Will | The next two Boons you find are limited to Common blessings. Afterward, restore Magick every second. | |
| Paralyzing Blood | For the next four encounters, whenever you take damage, you are stunned for 1.1 seconds. Afterward, whenever you exit a location, restore 20 Life. | |
| Paralyzing Charm | For the next five encounters, whenever you take damage, you are stunned for 0.5 seconds. Afterward, your Casts deal +55% additional damage. | |
| Paralyzing Chasm | For the next four encounters, whenever you take damage, you are stunned for 1.1 seconds. Afterward, your Casts deal +29% damage. | |
| Paralyzing Strike | For the next four encounters, whenever you take damage, you are stunned for 0.9 seconds. Afterward, your attacks deal +41% damage. | |
| Paralyzing Talent | For the next four encounters, whenever you take damage, you are stunned for 1.1 seconds. Afterward, you use -60% Magick. | |
| Pauper’s Revelation | For the next three encounters, you cannot earn Gold Crowns. Afterward, you Channel your Omega Moves 14% faster. | |
| Rejected Chasm | The next three Boons you find have one fewer blessing to choose from. Afterward, your Casts deal +45% damage. | |
| Rejected Creation | The next three Boons you find have one fewer blessing to choose from. Afterward, gain +1 Earth, Water, Air, Fire, Aether. | |
| Rejected Mind | The next three Boons you find have one fewer blessing to choose from. Afterward, gain max Magick. | |
| Rejected Revelation | The next four Boons you find have one fewer blessing to choose from. Afterward, you Channel your Omega moves 13% faster. | |
| Rejected Will | The next three Boons you find have one fewer blessing to choose from. Afterward, restore 8.5 Magick every one second. | |
| Slothful Blood | For the next four encounters, your movement and sprint are 59% slower. Afterward, whenever you exit a location, restore four Life. | |
| Slothful Celerity | For the next three encounters, your movement and sprint are 59% slower. Afterward, you move and sprint faster. | |
| Slothful Favor | For the next four encounters, your movement and sprint are 59% slower. Afterward, Boons have a 63% chance to be Rare or better. | |
| Slothful Strike | For the next five encounters, your movement and sprint are 59% slower. Afterward, your attacks deal 25% additional damage. |
Circe
When you encounter the enchantress Circe in the Rift of Thessaly, she’ll offer a choice of three powerful upgrades. The most effective options are Old Herbal Remedy, Lapis Lazuli Insight, and Red Citrine Divination, depending on your needs.
| Boon | Effect |
| Lapis Lazuli Insight | Randomly draw one of your active Arcana and upgrade it this night. |
| Old Herbal Remedy | Any healing effects are +25% stronger. Gain 50% life now. |
| Red Citrine Divination | Randomly draw one of your inactive Arcana and activate it this night. |
| Word of Greater Girth | Grow in size, so that your strikes deal +15% damage. |
| Word of Smaller Stature | Shrink in size, so you move +15% faster and have a +15% chance to Dodge. |
Demeter
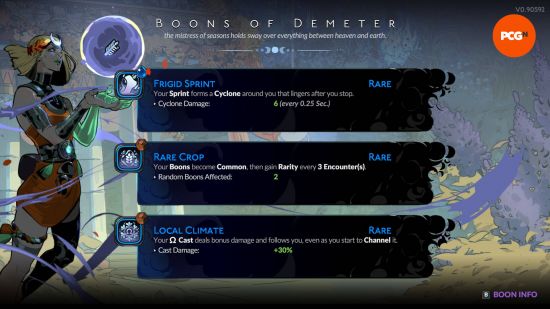
Melinoë’s grandmother, Demeter, grants her a chilling touch, allowing her to freeze opponents in place. This ability is especially useful against shielded or highly aggressive enemies, making it a strong choice for ranged weapons or attacks. The premier Demeter boons are Arctic Ring, Cold Storage, and Ice Flourish for their freezing capabilities. Additionally, Rare Crop is excellent for buffing other perks, while Winter Coat provides a valuable defensive shield.
| Boon | Effect | Element |
| Apocalyptic Storm | Zeus Duo: Your Blitz effects last longer and activate against all Blitz-afflicted foes at once. | Aether |
| Arctic Ring | Your Casts repeatedly deal damage in the area and inflict Freeze. (Water) | Water |
| Cherished Heirloom | Hera Duo: Most other Keepsakes you equip are stronger this night (if possible). | Aether |
| Coarse Grit | Infusion: While you have at least six Earth Boons, you cannot take more damage per hit than the limit. | N/A |
| Cold Storage | Your Freeze effects last longer. | Water |
| Freezer Burn | Hestia Duo: Whenever you inflict Freeze, amplify any Scorch effects already on the foe. | Aether |
| Frigid Sprint | Your sprint forms a cyclone around you that lingers after you stop. (Water) | Water |
| Gale Force | Your Casts also create a Cyclone at the binding circle. (Water) | Water |
| Hearty Appetite | Aphrodite Duo: You deal more damage the more life you have. | Aether |
| Ice Flourish | Your Specials deal more damage and inflict freeze. (Water) | Water |
| Ice Strike | Your attacks deal more damage and inflict freeze. (Water) | Water |
| Local Climate | Your Omega Cast deals bonus damage and follows you, even as you start to channel it. | Earth |
| Natural Selection | Poseidon Duo: Location rewards exclude max life, max magic, and Gold Crowns. Boons are more likely to be Rare or better. (Aether) | Aether |
| Plentiful Forage | Whenever you gather plants, seeds, or mushrooms, gain Max Life. Receive one Mystery Seed now. (Earth) | Earth |
| Rare Crop | Your boons become common, then gain rarity every three encounters. (Earth) | Earth |
| Room Temperature | Hephaestus Duo: Your Blast effects from Hephaestus clear Freeze. | Aether |
| Torrential Downpour | Apollo Duo: Each time you use your Omega Cast in an encounter, it gets stronger but also uses +5 Magick. (Aether) | Aether |
| Tranquil Gain | After remaining inactive for one second, rapidly restore Magick until you act. (Earth) | Earth |
| Tropical Cyclone | Apollo Duo: While standing in a gust, you randomly fire gales. | Aether |
| Weed Killer | Your Omega Attack deals more damage, but uses ten Magick. (Earth) | Earth |
| Winter Coat | After you enter a location, Prime a barrier that absorbs one instance of damage. (Earth) | Earth |
| Winter Harvest | Freeze-afflicted foes shatter at 10% HP, dealing damage in the area. | Earth |
Echo
Upon encountering a mysterious cloaked figure in the Mourning Fields, you’ll soon discover her unique ability: she can only repeat what she last heard. The best perks here depend heavily on your current run’s needs. If your previous run was particularly successful, ‘Boon Boon Boon’ can help you reclaim some of that former power. ‘Reward Reward Reward’ is another excellent choice, likely providing a duplicate of a powerful item that enhanced your current build.
| Boon | Effect |
| Boon Boon Boon | Gain a random Boon from the previous night. |
| Evade Evade Evade | Gain +50% dodge, but lose 2% of this every time you dodge. |
| Fight Fight Fight | Gain +50% life and Magick based on their limits, but lose 5% of this after each location. |
| Reward Reward Reward | Manifest a copy of your most recently claimed Reward. |
| Survive Survive Survive | Replace all spent uses of Death Defiance with ones that restore life and Magick, then less and less. |
Hades
Trapped in Tartarus, the former God of the Dead, Hades, is confined alongside his loyal guard dog, Cerberus. His perks uniquely influence aspects of the final boss or provide powerful advantages for swiftly eliminating them. Deep Dissent and Old Grudge are superb choices for disrupting Chronos, while Howling Soul offers the most consistent benefit among the remaining options.
| Boon | Effect |
| Cinerary Circle | Whenever you use 60 Magick, summon six Soul Urns. |
| Deep Dissent | In your confrontation, Chronos summons fewer reinforcements. |
| Howling Soul | Your Casts launch a projectile dead ahead. The binding circle forms where it hits. |
| Last Gasp | Deal more damage for each spent Death Defiance. |
| Life Tax | Restore life for 1% of the damage you deal until you reach the limit. |
| Old Grudge | In your confrontation, Chronos takes a burst of damage after the first three seconds. |
| Unseen Ire | After you take damage, go Dark for ten seconds. Recharge in 40 seconds. |
Hephaestus
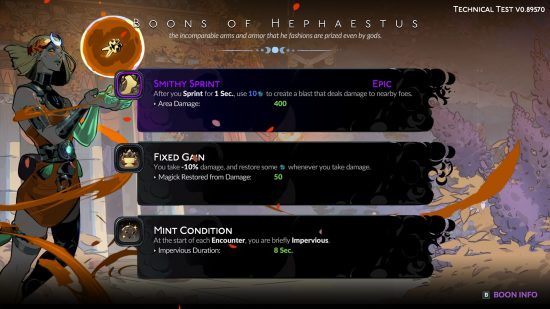
Hephaestus stands out as one of the most potent divine benefactors, easily allowing you to craft powerful builds, especially with ranged weapons. His earth-based perks either provide substantial boosts to overall damage or apply the ‘Vent’ effect to enemies, delivering an additional burst of damage. This has the potential to make quick work of even the most formidable foes. Our top picks for Hephaestus boons include Furnace Blast, Molten Touch, Tough Trade, and Volcanic Flourish for sheer damage output, while Fixed Gain offers valuable defensive benefits and Magick recovery.
| Boon | Effect | Element |
| Anvil Ring | Your Casts deal damage three times in succession, but in a small area. | Earth |
| Chain Reaction | Hestia Duo: If you use your blast effects from Hephaestus just after they recharge, they fire two times. | Aether |
| Fixed Gain | You take -10% damage and restore some Magick whenever you take damage. | Earth |
| Furnace Blast | Your blast effects from Hephaestus also inflict Vent on foes. | Fire |
| Heavy Metal | Gain some armor. Foes’ attacks cannot knock you away. | Earth |
| Martial Art | Infusion: Your attack and Special deal more damage for each Earth Boon you have. | N/A |
| Master Conductor | Zeus Duo: Your chain-lightning deals more damage per bounce and can bounce to you. | Aether |
| Mint Condition | At the start of each encounter, you are briefly Impervious. | Earth |
| Molten Touch | Your attacks and Specials deal bonus damage to armor. | Fire |
| Premium Service | Your Aspect on the Nocturnal Arms is even stronger. | Earth |
| Room Temperature | Demeter Duo: Your blast effects from Hephaestus clear Freeze. | Aether |
| Seismic Hammer | Poseidon Duo: Your Cast occasionally creates a blast that deals 500 damage in the area. | Aether |
| Smithy Sprint | After you Sprint for one second, use ten Magick to create a blast that deals damage to nearby foes. | Fire |
| Soft Caress | Aphrodite Duo: The first time you would take damage in each encounter, get HP instead. | Aether |
| Spiteful Strength | Hero Duo: Your attacks and specials deal more damage while not empowered by Boons. | Aether |
| Stellar Slam | Apollo Duo: Your blast effects from Hephaestus deal damage in a larger area. | Aether |
| Tough Trade | If you take damage during your attacks or Specials, they are stronger if they hit. | Fire |
| Trusty Shield | After you enter a location, Prime 30 Magick to gain armor until the next location. | Earth |
| Uncanny Fortitude | Gain bonus max life based on your Magick limit. | Earth |
| Volcanic Flourish | Your Specials occasionally create a blast that deals 400 damage in the area. | Fire |
| Volcanic Strike | Your attacks occasionally create a blast that deals 200 damage in the area. | Fire |
Hera

Hera’s primary boon ability is ‘Hitch’, which allows you to deal damage to multiple enemies simultaneously. Once you inflict ‘Hitch’ on one foe, every subsequent hit you land on them will also splash damage to all other ‘Hitch’-affected enemies on screen. This effect is particularly devastating with ranged weapons. Our top picks for Hera boons include Dying Wish, Hereditary Bane, Sworn Flourish, and Nasty Comeback.
| Boon | Effect | Element |
| All Together | Gain a variety of elements and one Infusion Boon for each. | Aether |
| Born Gain | Whenever you run out of Magick, Prime to restore all Magick up to the reduced limit. | Earth |
| Brave Face | Automatically use Magick to resist up to 50% of any damage. | Aether |
| Bridal Glow | Make one random Boon Heroic and increase its level. | Earth |
| Cherished Heirloom | Demeter Duo: Most other Keepsakes you equip this night are stronger if possible. | Aether |
| Dying Wish | Whenever Hitch-afflicted foes are slain, damage all other Hitch-affected foes. | Earth |
| Engagement Ring | Your Casts last 200% longer and deal damage to every foe that joins the encounter. | Earth |
| Family Trade | Any Sacrifice Boons you choose are stronger. One will be offered as soon as possible. | Earth |
| Funeral Pyre | Hestia Duo: While you channel your Omega Moves, repeatedly inflict Scorch on foes. | Aether |
| Golden Rule | Poseidon Duo: You deal more damage the more gold you have. | Aether |
| Hereditary Bane | Your Hitch effects deal more damage and last +5 seconds. | Earth |
| Keen Intuition | Whenever you use Omega moves while you have 100% Magick, they deal more damage. | Earth |
| King’s Ransom | Zeus Duo: Give up all your Boons of Hera. For each, raise the level for all Boons of Zeus. | Aether |
| Nasty Comeback | After you take damage, inflict your foe with Hitch and deal damage in greater measure. | Earth |
| Nexus Sprint | Your Sprint inflicts Hitch on nearby foes, which spreads to other foes near them. | Earth |
| Proper Upbringing | Infusion: While you have at least two of each element, all your Common Boons gain rarity. | N/A |
| Queen’s Ransom | Zeus Duo: Give up all your Boons of Zeus. For each, raise the level for all Boons of Hera. | Aether |
| Soul Mate | Aphrodite Duo: Foes with Hitch take more damage and are Weak, but only two can be afflicted at a time. | Aether |
| Spiteful Strength | Hephaestus Duo: Your attacks and specials deal more damage while not empowered by Boons. | Aether |
| Sun Worshipper | Apollo Duo: In each encounter, the first foe you slay returns to fight for you. | Aether |
| Sworn Flourish | Your Specials deal more damage and inflict Hitch. | Earth. |
| Sworn Strike | Your attacks deal more damage and inflict Hitch. | Earth |
| Uncommon Grace | While none of your other Boons are Common, deal more damage. | Earth |
Hermes

Hermes, the swift messenger of the Olympian gods, offers perhaps the most universally beneficial boons. His perks consistently focus on enhancing your dodge capabilities, boosting attack speed, or slowing down enemies and their projectiles. While you might not encounter many of them during a single run, our favorites for their impactful benefits are Hard Target, Hasty Retreat, Nitro Boost, Stutter Step, and Witty Retort.
| Boon | Effect | Element |
| Hard Target | Most foes’ ranged shots are slower. | Air |
| Hasty Retreat | Gain dodge chance and move speed, scaling with the amount of Boons you have. | Air |
| Mean Streak | Each time you slay a foe, deal more damage for the next 30 seconds. | Air |
| Nimble Limbs | Your attack, special, and cast are all faster. | Earth |
| Nitro Boost | Your Sprint is 20% faster and gives you a barrier that ignores instances of damage. | Fire |
| Paid Dues | Whenever you take damage, you love gold before you lose health. | Air |
| Quick Buck | You find Gold Crowns in greater quantities. Receive 100 Gold Crowns now, plus the bonus. | Air |
| Racing Thoughts | Your Omega moves are faster. | Earth |
| Stutter Step | You can dash more frequently. | Earth |
| Success Rate | Your chance-based effects are more likely to occur, except for dodge or daze. | Earth |
| Tall Order | Infusion: While you have at least two of each of Earth, Water, Air, and Fire elements, you deal more damage. | N/A |
| Travel Deal | Your first purchase in each location costs less gold, and an additional item becomes available afterward. | Fire |
| Witty Retort | Your Hex requires less Magick before it is ready. | Earth |
Hestia
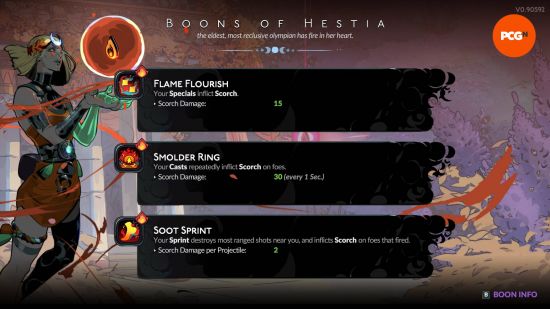
Many of Hestia’s boons are centered around inflicting the ‘Scorch’ ailment, which deals damage over time. This can be incredibly effective for wearing down bosses from any range and effortlessly melting enemy shields. Our top Hestia Boon recommendations include Flame Flourish/Flame Strike, Smolder Ring, and Highly Flammable.
| Boon | Effect | Element |
| Burning Desire | Aphrodite Duo: Up to +12 Lone Shades appear in locations. Sprint into them to launch a fiery blast. | Aether |
| Burnt Offering | Gain max life and max Magick, but give up one Boon selected by Hestia. | Fire |
| Cardio Gain | Whenever your attack or special deals damage, restore Mana. | Fire |
| Chain Reaction | Hephaestus Duo: If you use blast effects from Hephaestus just after they recharge, they fire twice. | Aether |
| Controlled Burn | Your Omega Special also launches a fiery projectile but uses +10 Magick. | Fire |
| Flame Flourish | Your Specials inflict Scorch. | Fire |
| Flame Strike | Your attacks inflict Scorch. | Fire |
| Flash Fry | Your foes perish in a blast that damages any surrounding foes. | Fire |
| Fourth Degree | Ares Duo: Your fireball effects from Hestia inflict Wounds with ever greater power. | Aether |
| Freezer Burn | Demeter Duo: Whenever you inflict Freeze, amplify any Scorch effects already on the foe. | Aether |
| Glowing Coal | Hold Cast to aim a fiery projectile that explodes on impact. The binding circle forms there. | Fire |
| Heat Rush | Your sprint destroys most ranged shots near you, and inflicts Scorch on foes that fired. | Fire |
| Highly Flammable | Whenever you inflict Scorch on a foe for the first time, inflict more. | Fire |
| Hot Pot | You have a chance to dodge, which is doubled against Scorch-inflicted foes. | Fire |
| Incandescent Aura | Hera Duo: Whenever you restore mana during encounters, damage surrounding foes. | Aether |
| Pyro Technique | Your Scorch effects deal damage faster. | Fire |
| Scalding Vapor | Poseidon Duo: If foes with Slip are struck by fire from Hestia, they are engulfed in steam. | Aester |
| Slow Cooker | Infusion: Your attacks and Specials gain Power for each Fire Boon you have. | N/A |
| Smolder Ring | Your Casts repeatedly inflict Scorch on foes. | Fire |
| Thermal Dynamics | Zeus Duo: Your Blitz effects also inflict Scorch whenever they deal damage. | Aether |
| Warm Breeze | Apollo Duo: Whenever your dodge or Daze causes a foe to miss, restore some health. | Aether |
Icarus
You can find Icarus in the Rift of Thessaly, where he’ll present you with a choice of three unique inventions. The most beneficial Icarus Boons are Destructive Coating, which carries minimal drawbacks, and Supply Chain, an incredibly potent option for rapidly enhancing your boons.
| Boon | Effect |
| Destructive Coating | Gain +40 armor. The next time you lose all your armor, deal 4,000 damage to nearby foes. |
| Explosive Intent | Your Omega moves also deal damage in an area around foes that hit, but they use ten more Magick. |
| Hazard Boom | Your Casts also blast the area after four seconds, dealing 500 damage to foes, but also 20 to you. |
| Ingenious Flourish | Your specials gain 20 power, but you prime 40 Magick. |
| Ingenious Strike | After you enter a location, Prime 20 Magick to give your attacks +10 Power. |
| Protective Coating | Gain +80 armor. The next time you lose all your armor, become impervious for eight seconds. |
| Supply Chain | Each time you clear five encounters, you receive +10 Healing and three Pom Slices. |
Medea
Upon finding Medea in the City of Ephyra, her curses offer some of the most potent effects for surface runs. For those focusing on Magick builds, ‘Traces of Spirit’ is highly recommended. ‘Life from the Dead’ provides a small chance for recovery, which can be useful in a pinch. While ‘Suffering on Sight’ can be decent, its randomized nature means you can’t rely on it to consistently save you from tough enemies.
| Boon | Effect |
| Life from the Dead | After a foe is slain, it has a 5% chance to drop +10 Healing (limit of one per encounter). |
| Malice in Kind | Whenever a foe makes you lose Death Defiance, it loses 15% life. |
| Suffering on Sight | After a foe joins the encounter, it randomly takes from one to 999 damage. |
| Traces of Spirit | After each encounter, gain +10 max Magick. |
| Wealth from the Dead | After a foe is slain, it has a 10% chance to drop +20 Gold Crowns (limit of two per encounter). |
Narcissus
Within Oceanus, Narcissus’s gifts are universally valuable, adapting well to various needs. The quintessential choice is ‘Life Savings’, which essentially grants you an extra life. ‘Heartfelt Condolences’ offers the most significant boost to maximum health, while ‘Mixed Blessings’ provides a random boon from one of the gods, adding an element of surprise and potential power.
| Boon | Effect |
| Ancestral Offering | Receive a gift of +25 max life and 50 bones. |
| Heartfelt Condolences | Receive a gift of +50 max life and ten ashes. |
| Life Savings | Receive a gift of one Death Defiance and one Deathcap. |
| Mixed Blessings | Receive a gift of one mystery Boon and one Mystery Seed. |
| Mystic Secrets | Receive a gift of +30 max Magick and 20 Psyche. |
| Precious Metals | Receive a gift of six Silver and 100 Gold Crowns. |
| Verdure Sampler | Receive a gift of one Pom Slice, two Moly, and three Nightshade. |
Poseidon

As the God of the Sea, Poseidon’s water-based boons excel at pushing enemies away with powerful waves. This can be used to corner formidable foes, deal bonus damage to those affected by his ‘Slip’ ailment, or simply repel anything that gets too close. Therefore, these boons are ideally suited for melee weapon users. Our top recommendations for Poseidon Boons include Breaker Sprint, Flood Gain, Slippery Slope, Wave Strike, and Hydraulic Might.
| Boon | Effect | Element |
| Arterial Spray | Ares Duo: Your splash effects from Poseidon may hit twice. | Aether |
| Beach Ball | Apollo Duo: Your Sprint creates a watery sphere behind you. After you stop, it surges ahead and bursts. | Aether |
| Breaker Sprint | Whenever you sprint, you damage and knock away the first foe you run into. | Water |
| Buried Treasure | Any minor finds and gold are worth more, and you receive gold, health, and Bones now. | Water |
| Depth Charge | After dealing damage with your Omega moves, create a water blast near the first foe struck. | Water |
| Flood Gain | After you strike a foe with your weapon, a Spirit Bubble may appear. | Water |
| Geyser Spout | Your Omega Cast gains power and knocks foes away. | Water |
| Golden Rule | Hera Duo: You deal more damage the more gold you have. | Aether |
| High Surf | Hit surrounding foes with a powerful splash as they start to strike, but you prime 30 Magick. | Water |
| Hydraulic Might | At the start of each encounter, your attacks and specials are stronger for ten seconds. | Water |
| Island Getaway | Aphrodite Duo: You take less damage from nearby foes. Boons of Aphrodite treat all foes as nearby. | Aether |
| Killer Current | Zeus Duo: Your lightning deals more damage to Slip-affected foes. | Aether |
| King Tide | Your Splash effects from Poseidon are larger and deal bonus damage to Guardians. | Water |
| Natural Selection | Demeter Duo: Location rewards exclude Life Up, Magick Up, and Gold. Boons are more likely to be Rare or better. | Aether |
| Scalding Vapor | Hestia Duo: If foes with Slip are struck by fire from Hestia, they are engulfed in steam. | Aether |
| Sea Star | Whenever you claim rewards other than Boons, Daedalus Hammers, or rare resources, a copy may appear. | Water |
| Seismic Hammer | Hephaestus Duo: Your Omega Cast occasionally creates a blast that deals 500 damage in the area. | Aether |
| Slippery Slope | Your splash effects from Poseidon also inflict Slip on foes. | Water |
| Tidal Ring | Your casts also immediately hit foes in front of you with a powerful splash. | Water |
| Water Fitness | Infusion: Gain max health for each water Boon you have. | N/A |
| Wave Flourish | Your Specials hit foes with a splash that knocks other foes away. | Water |
| Wave Strike | Your attacks hit foes with a splash that knocks other foes away. | Water |
Selene
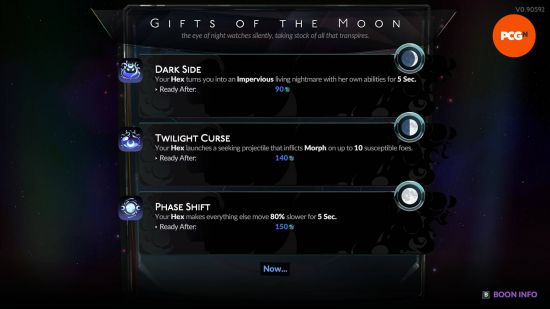
The Titaness of the Moon, Selene, emerges as an unexpected ally in your battle against Chronos. Her boons all profoundly impact your Hex attack. By expending Magick through Omega attacks, you’ll charge this unique technique. The optimal choice depends on your current build, but the best options include Lunar Ray for its potent burst damage, Moon Water for unparalleled recovery, and Phase Shift for its ability to drastically slow down everything, making combat much more manageable.
| Boon | Effect |
| Dark Side | Your Hex turns you into an Impervious living nightmare with her own abilities for five seconds (Ready after 90 Magick). |
| Lunar Ray | Your Hex fires a beam that deals up to 1,200 damage over three seconds (Ready after 120 Magick). |
| Moon Water | Your Hex restores 25 life up to three times, which resets whenever you use fountains (Ready after 70 Magick). |
| Night Bloom | Your Hex raises one random slain foe from this encounter to fight for you for 12 seconds (Ready after 100 Magick). |
| Phase Shift | Your Hex makes everything else move 80% slower for five seconds (Ready after 150 Magick). |
| Sky Fall | Your Hex inflicts Shine and deals damage to a random surrounding enemy eight times (Ready after 60 Magick) |
| Total Eclipse | Your Hex blasts the target area for 1,000 damage after four seconds (Ready after 200 Magick). |
| Twilight Curse | Your Hex launches a seeking projectile that inflicts Morph on up to ten susceptible foes (Ready after 140 Magick). |
| Wolf Howl | Your Hex makes you rise up, then crash down in the target area for 200 damage (Ready after 80 Magick). |
Zeus
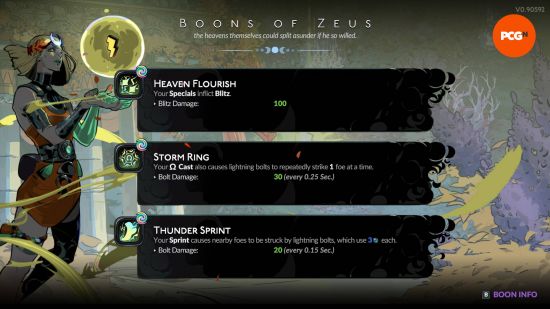
Zeus’s electrifying skills curse your foes, but you must maintain relentless pressure to fully exploit them. When an enemy is afflicted by ‘Blitz’, they are struck by lightning after taking 120 damage within the curse’s duration. You can further amplify this with the most effective Zeus perks: Double Strike, Electric Overload, Heaven Flourish/Heaven Strike, and Storm Ring.
| Boon | Effect | Element |
| Air Quality | Infusion: While you have at least five Air Boons, you can never deal less damage than the limit. | N/A |
| Arc Flash | Damage from your Omega moves immediately activates Blitz effects and makes them stronger. | Air |
| Divine Vengeance | After you take damage, your foe is struck by lightning, and again 50% of the time. | Air |
| Double Strike | Your lightning bolt effects may strike one more time. | Air |
| Electric Overload | Your chain-lightning deals more damage and bounces more times. | Air |
| Glorious Disaster | Apollo Duo: You can channel +30 Magick into your Cast to repeatedly strike foes with lightning bolts. | Aether |
| Hail Storm | Demeter Duo: Your freeze effects also cause lightning bolts to repeatedly strike afflicted foes. | Aether |
| Heaven Flourish | Your specials inflict Blitz. | Air |
| Heaven Strike | Your attacks inflict Blitz. | Air |
| Heinous Affront | Ares Duo: Inflicting Wounds occasionally also inflicts all your ‘after you take damage’ effects. | Aether |
| Ionic Gain | In each encounter, an Aether Font appears in the area, restoring all Magick when used. | Air |
| Killer Current | Poseidon Duo: Your lightning deals more damage to Slip-affected foes. | Aether |
| King’s Ransom | Hera Duo: Give up all your Boons of Hera. For each, raise the level for all Boons of Zeus. | Aether |
| Lightning Lance | Hold Cast to aim where the binding circle appears. Foes within are struck by lightning. | Air |
| Master Conductor | Hephaestus Duo: Your chain-lightning deals more damage per bounce and can bounce to you. | Aether |
| Power Surge | Whenever you use Magick, a random surrounding foe is struck by lightning. | Air |
| Queen’s Ransom | Hera Duo: Give up all your Boons of Zeus. For each, raise the level for all Boons of Hera. | Aether |
| Romantic Spark | Aphrodite Duo: If you Sprint into Blitz-afflicted foes, the effect activates immediately and is stronger. | Aether |
| Shocking Loss | Whenever you first deal damage to susceptible foes, you may destroy them outright. | Air |
| Static Shock | After you enter a location, prime 50 Magick to make your strikes emit chain-lightning. | Air |
| Storm Ring | Your Cast also causes lightning bolts to repeatedly strike one foe at a time. | Air |
| Thermal Dynamics | Hestia duo: Your Blitz effects also inflict Scorch whenever they deal damage. | Aether |
| Thunder Rush | Your sprint causes nearby foes to be struck by lightning bolts. | Air |
Now that you know our picks for the best Hades 2 boons and have all the information you could need on the rest, you can pick and choose what works for you and create an unstoppable build. Before you jump in for real, be sure to check out guides on the Hades 2 Arcana Cards – an invaluable resource for surviving the underworld’s onslaught.